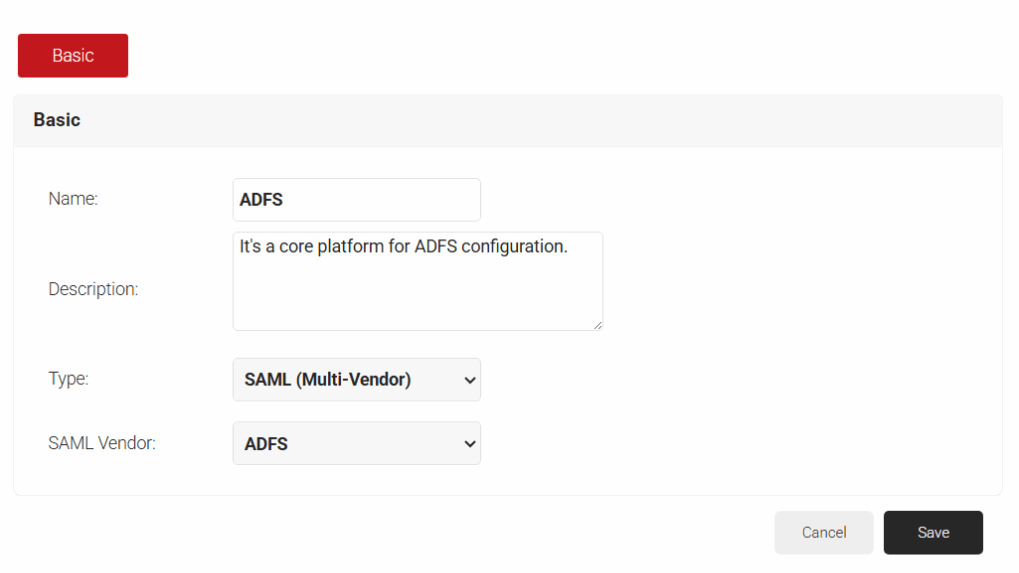
To add a core provider, perform the following steps:
- Log in to the JoinNow Management Portal.
- Navigate to Integration Hub > Core Platforms.
- Click Add.

- Enter a Name and Description for the ADFS platform in JoinNow.
- From the Type drop-down list, set the Type to SAML (Multi Vendor), and choose SAML Vendor as ADFS.
- Click Save.
- Select the Configuration tab.
- Under Core Provider Info, click Choose File in the Metadata section. Then open the Metadata downloaded previously, and click Upload and Update.
- Under Service Provider (SP) Info, the URLs for Configuring Azure Directory are provided. Configure the URLs in the Azure portal to obtain the metadata file.
- Click Choose File to navigate to the file. Choose the file and click Upload.
- Click Update.

SAML is a secure authentication protocol often used to enable single sign-on to access multiple applications. It is also used to enroll unmanaged devices/BYODs for certificates that users navigate to our onboarding landing page and enter their credentials. During the SAML authentication process, we verify their identity in the Core Provider before issuing a certificate.
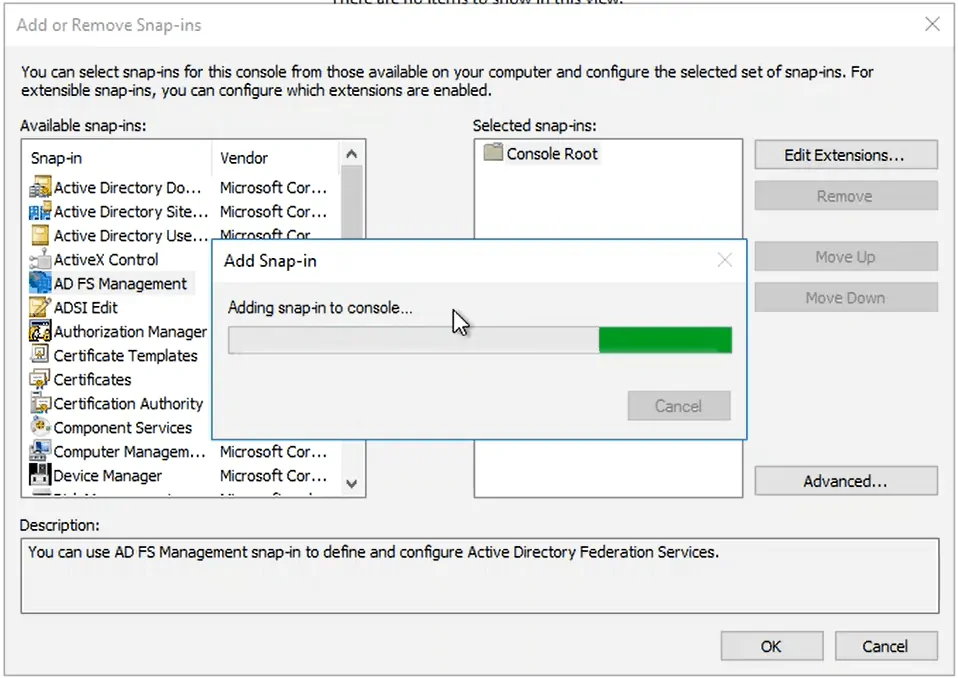
- Run the MMC command to open the Microsoft Management Console.
- Click File > Add/Remove Snap-in.
- Add the ADFS Management to the selected snap-ins, and click OK.
- Select the main node ADFS, and in the left panel, click Relying Party Trust.
- In the right pane under Actions, select Add Relying Party Trust.
- Using the Add Relying Party Trust Wizard that appears, click Start (with the Claims aware bubble selected).
- Select Import data about the relying party from a file and click Browse to find and select the previously downloaded metadata, then click Next.
- Enter a Display name and click Next.
- Under Choose an access control policy, select whether to use a user blacklist or a whitelist. Click Next, and click Next again on the next screen:
- NOTE: If you choose whitelist (Deny all users), you will need to grant access to users/groups at a later time.
- To finish, click Close.
- Right-click the Relying Party Trust you created and select Edit Claim Issuance Policy.
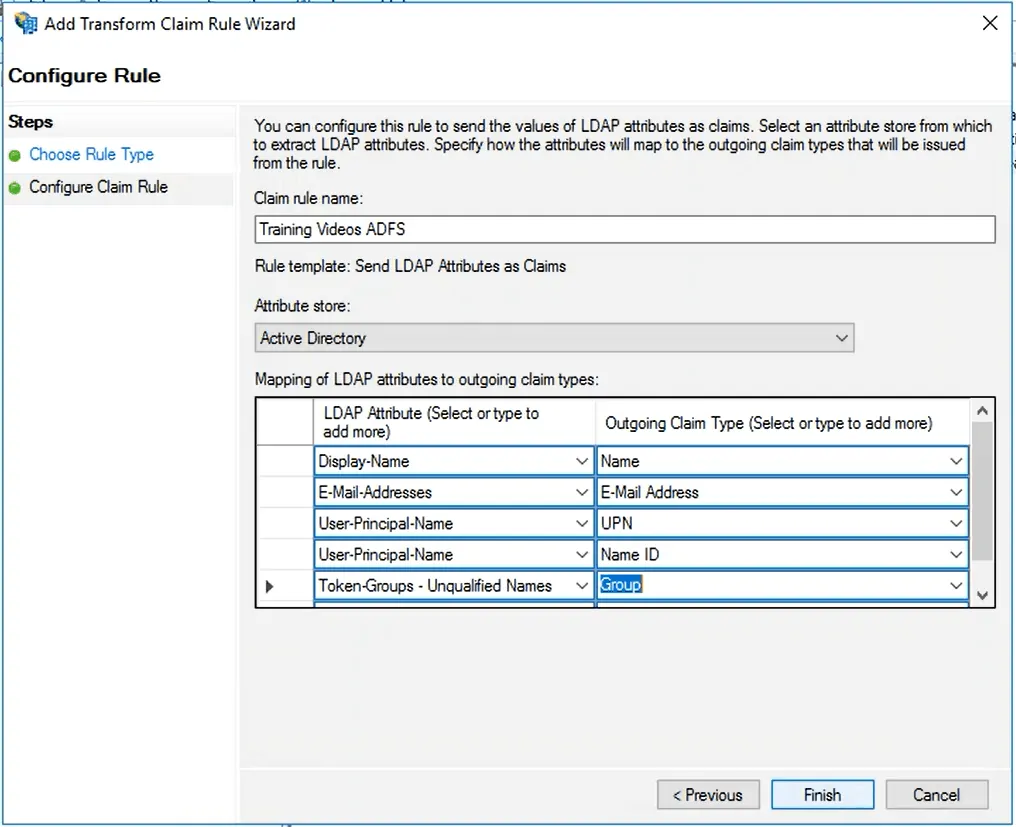
- In the window that appears, click Add Rule.
- Ensure the Claim rule template is set to Send LDAP Attributes as Claims and click Next.
- Enter a Claim rule name and change the Attribute store to Active Directory.
- Configure LDAP to SAML attribute mapping based on your use case and click Finish > Apply > OK:
- This will include the different attribute fields that will be populated with the Core Provider metadata.
- This will include the different attribute fields that will be populated with the Core Provider metadata.
- Right-click the relying party trust you created, and click Properties.
- Select the Advanced tab and in the Secure hash algorithm drop-down, select SHA-1 and click Apply > OK.
- Before beginning the next section, right-click the Relying Party Trust that was previously created and select Edit Claim Issuance Policy.
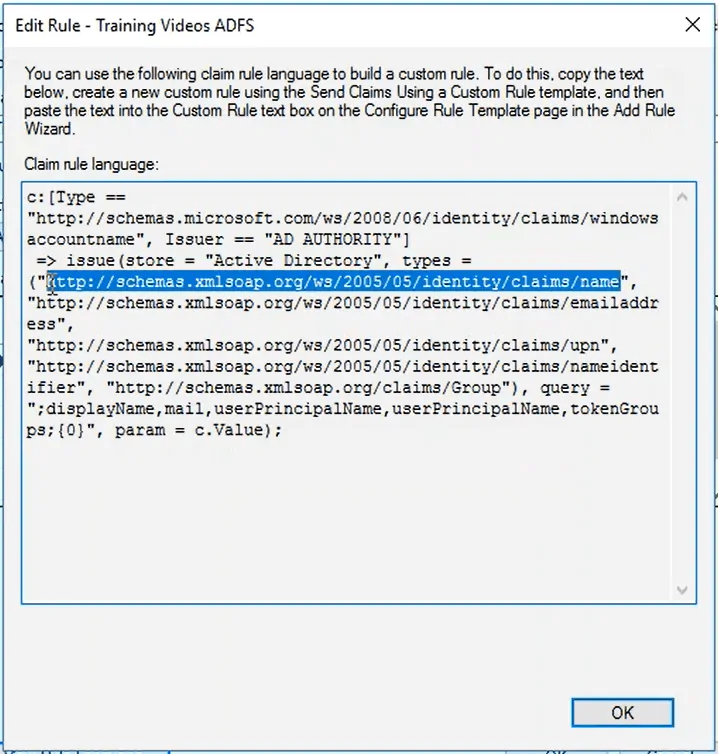
- Select the newly created Rule and click Edit Rule.
- Click View Rule Language to read the attributes you created:
- You will make use of these in the SecureW2 JoinNow Management Portal.
Attribute Mapping can control which attributes are passed from the Core Provider to the SAML Application and authenticate directly with SecureW2. Here, these attributes help grant access to user accounts because they are encoded in the user’s certificates.
To enable SAML Authentication, you need to configure attribute mapping in both the Federation Server and the SecureW2 JoinNow Management Portal.
There are a few steps to be followed for mapping the attributes that SecureW2 receives from Active Directory Federation Services (ADFS):
- Log in to the JoinNow Management Portal.
- Navigate to Integration Hub > Core Platforms, and click Edit for the previously created ADFS Core Provider.
- Click the Attribute Mapping tab and click Add.

- Reference the Rules you have open to create the Local and Remote attributes.
- For example, an attribute based on a user’s name would read:
- Local Attribute: displayName
- Remote Attribute: USER_DEFINED
- Navigate to the Microsoft Console. Open the Rule Language and copy the URL related to the Name attribute (see the image below).
- Add an attribute for each Rule that was created, and when finished, click Update:
- You can close the Rule Language window that was open in the Microsoft Console.
- You can close the Rule Language window that was open in the Microsoft Console.
- Log in to the JoinNow Management Portal.
- Navigate to Policy Management > Authentication.

- Click Add Authentication Policy.
- In the Name field, enter an authentication policy name.

- Click Save.
- Click the Conditions tab, then select the network profile you created from the Profile drop-down list and click Update.

- Navigate to Policy Management > Policy Workflows.
- Click Add Policy Workflow.
- In the Name field, enter the name of the policy workflow and click Save.

- Click the Conditions tab, select the previously created Core Provider from the Core Provider drop-down list, and click Update.

- Navigate to Policy Management > Enrollment.
- Click Edit on the DEFAULT ENROLLMENT POLICY.

- Click the Conditions tab.
- In the Policy Workflow list, select the policy workflow created earlier.
- In the Device Role list, select the Default Device Role Policy.

- Click Update.
- Whenever modifying the Profile Authentication, you must Re-Publish the Network Profile after you have completed editing:
- Navigate to Device Onboarding > Profiles and click Re-publish on the Network Profile you created, and then click OK.

- Navigate to Device Onboarding > Profiles and click Re-publish on the Network Profile you created, and then click OK.
 SecureW2 offers a seamless, completely passwordless solution that helps prevent security risks and enhance authentication server performance. Following the steps outlined in this guide, you will have configured Certificate-Based Authentication through Active Directory Federation Services (ADFS).
With our managed PKI service, we offer JoinNow MultiOS, which helps BYODs quickly enroll in digital certificates by entering their valid credentials once. They are then verified in your Core Provider through the secure SAML protocol. For more information, click here to see our details.
Active Directory Federation Services is a registered trademark of Microsoft in the United States and/or other countries. Other trademarks, logos, and service marks used in this site are the property of SecureW2 or other third parties.